Pages

Sunday 24 November 2013

Food from the Fat Duck: Red Cabbage Gazpacho with Mustard Ice Cream

Here we are, at my first attempt do actually make a Fat Duck recipe. The Fat Duck is of course the restaurant of celebrated chef Heston Blumenthal. As I outlined here, I have put of trying recipes from the Big Fat Duck Cookbook for years, but with a sudden onset of braveness I have decided to give some of them a try. And the first one out is the Red Cabbage Gazpacho with Mustard Ice Cream. So lets get at it.

This soup is a take on the traditional gazpacho soup from Spain, but it is made from, you guessed it, red cabbage. For some reason. red cabbage is only readily available in stores here in Norway around Christmas. One of Norway's favourite
Christmas dinners is rib of pork with slightly pickled red cabbage, so right now it is in all stores, but between January and November it may actually be difficult to get hold of. So in this country, this chilled summer soup is easiest made in November/December when there will be below zero temperatures outside. Not perfect, but still.

The recipe calls for 450 gams of red cabbage juice and suggests that two cabbages will produce this. So I buy three, just in case. A few years ago my wife bought a juicer. It is a Phillips appliance that so far has lived a quiet life in one corner of my kitchen top. My wife has been using it to make carrot juice other juices for drinking. I must admit I have not given it a thought. And this summer I actually stored it in the basement because nobody was using it. But now it is up in the kitchen again, ready for service.

So I start with one half of the first cabbage, cutting it into bits and forcing it through the juicer. Juice is pouring out. Lots of it. I don't know if it is my juicer that is extraordinary good or if Norwegian cabbages are much larger than others, but after one half of my first cabbage I have more than the 450 grams required!

The juice is mixed with 30 grams of white bread. This is then left in the fridge for two hours before straining. In traditional Gazpacho you use bread as a thickener, but here, Heston probably only wants the aroma and not the texture. Anyway, the cabbage part is ready.

The soup will be thickened with a red wine mayonnaise. This is a nice way to thicken soups giving a rich feel to it. The mayo is made my combining two egg yolks and 15 grams of Dijon mustard and then whisking in 180 grams of grapeseed oil. Actually the recipe calls for 36 grams of egg yolk. That is how this recipes go in the book. Nothing is left to chance. Everything is down to the exact gram, or sub-gram when it comes to things like Agar-agar or Gellan. I must admit that my two yolks weighted in at 42 grams, so sue me.


After whisking in the oil, the mayo is quite stiff. This is the time to add 15 grams of red wine vinegar and 30 grams of red wine. Well, the book says Cabernet Sauvignon vinegar, but that was not to be found in my corner of the world, so I used a good red wine vinegar. I do not know what this does to the taste of the finished product, but I do hope it does not ruin it completely.

To finish the gazpacho, mix the cabbage juice and 40 grams of the mayo and season with 15 grams of salt and 60 grams of red wine vinegar.

Now for the mustard ice cream. 85g of egg yolks (four yolks in my
case) is whisked together with 40 caster sugar for 5 minute. 500g of whole milk is heated to 60 degrees Celsius. Actually, there should also be 25g of skimmed milk powder. I found this out after coming home from shopping, so don't tell anyone, but I am making
it without that. when at 60 degrees, the milk is added to the eggs, and then it is all heated up to 70 again and held there for 10 minutes to pasteurize. It is then cooled and mustard is added. This recipe calls for Pommery grain mustard. Again this is something I could not get hold of. I used a strongish French grain mustard mixed with a bit of milder Norwegian grain mustard. I put the mixture in the fridge over night before I put it in my ice cream machine.

The last bit of this puzzle is the cucumber brunois. This is made by slicing cucumber thinly lengthwise, putting the slices in a single layer in a sous vide bag and pulling a vacuum on it. This will start crushing the cell walls in the cucumber, compressing it and concentrating the flavour. This is similar to what I did to my strawberries in this post. One problem with vacuuming something moist this way with this type of machine is that liquid will be pulled into the vacuum machine. I have found that if I place a piece of kitchen paper in the opening of the bag, this will absorb the liquid but still allow the air to be sucked out. Repeating this step will concentrate the cucumber even more. The sheets are then taken out and skin and the centre core removed and the flesh cut into 2mm squares.

To put it all together, make another 80g of fresh cabbage juice and add to the gazpacho. This may sound strange. Why not just add it all in the first step? According to the chapter on juicing in volume two of Modernist Chef page 338, the distinctive aromas of a number of fruits and vegetables occur due to enzymes reacting to components that are released as cell walls break down. As these components run out, the enzymes stop working and the fresh aromas disappear. But when we add a little more fresh juice, the enzyme have new fuel to work with, and the freshness returns. To serve, place some cucumber in a bowl, place a rocher of ice cream on it and pour the soup around.

So, was it a success? The colour is fantastic. The taste is quite pungent and peppery with a bit of acidity to it. The mustard ice cream came out quite well. That may also be nice to serve with pork in some way.


Food from the Fat Duck - Is it possible to make?

Looking back on previous posts I find that I have been going on and on about two topics: The Modernist Cuisine book (or books, rather) and the chef Heston Blumenthal. And to all of you who just read that sentence thinking "At last there is something else", I have to say I am sorry, but no. Today I will be taking a closer look at the first modernist cookbook I got hold of, The Big Fat Duck Cookbook containing recipes from Heston's famous restaurant The Fat Duck.

This is a great book in more than one way. First of all it is big and heavy and well made with four sateen bookmarks. The first part of the book describes why and how Heston became a chef
and what lead him on to the path that eventually made him start experimenting with new ideas in food. In the second part are the recipes, and the third part describes some of the science involved. And all over are gorgeous pictures and great art. 

This was, as I said, the first cookbook I got that had this new, fancy food in it. When I first started reading it, I enjoyed it enormously, but I did not think I would ever be able to make any of the food. These dishes often use lots of ingredients a normal amateur has not heard of. They also often require equipment that is normally not found in an ordinary kitchen. They are very long and very elaborate, one dish can contain ten different elements or more and may take days to prepare. A dish often spans 4-6 pages in the book. Ok, the first part of each recipe is the story behind the dish, but you still have a lot of pages full of unknown ingredients and tools. So I definitely thought they were out of reach.

But that was before I started reading Modernist Cuisine, before I got a sous vide set-up and other stuff at home and before these strange ingredients actually started to appear in internet stores and even in stores here in Oslo. And on the web, more and more sites written by ordinary blokes report successful projects. So now the task does not seem impossible any more. I have decided to try to make food from the Fat Duck.

I actually thought I would be very brave and start a project to cook all the recipes and document it on the blog. That would be a great, new thing. But, then I stumbled over another blog called The Big Fat Undertaking, where a Dutch student had done just that and succeeded. You can find the blog here:

http://thebigfatundertaking.wordpress.com/

So that project sort of imploded. But, starting tomorrow, I will be trying out Fat Duck recipes on my blog. I may not do them all, but I will try to go through a good number of them. First out will be the Red Cabbage Gazpacho with mustard ice cream.

Stay Tuned.


Wednesday 20 November 2013

Chocolate and stilton - the verdict

I promised a report from my guests on Sunday who tested my stilton and port truffles. It has been a bit hectic this week, so I apologise for the delay to all of you who have been holding your breaths.

I served these between my meet course and desert. I did tell what they contained and that it was an experiment and that it was absolutely ok to say they were terrible. But they didn't, sweet things. They said they liked them. And I liked them, too. The cheese taste was there, but it was suitably discreet, so the mix of stilton and mascarpone was good. What was a bit disappointing was that the port filling that was a bit tricky to implement was difficult to taste. It sort of disappeared. I could have used more of it, but that would require larger cavities witch would be more difficult. I could also have concentrated the port by boiling reducing it. Perhaps that would be the solution. But all in all they were good.

Stilton and port truffles, v002 - Success.

Sunday 17 November 2013

Chocolate and stilton - an experiment

I was lounging on the sofa watching Heston Blumenthal again. It was How to cook like Heston, episode 5 about cheese. I love cheese, and I was learning lots of tips. It was then, in the middle of a recipe with stilton cheese, a peculiar sentence reached my ears. "Stilton goes marvellously well with chocolate", the slightly bonkers cook said and served the thing up on a chocolate biscuit. "What the...", I thought. I love stilton, I love chocolate, and now it turns out they are practically married! I felt like the great chef had spilt the beans on a secret so big that probably only the highest ranking eldest in the secret chef guild would know about it. Of course, a quick search on the internet revealed that this is a well know fact and that I probably was the only one who did not know.

Anyway, I started thinking about making a kind of a pre-dessert thingy in the shape of a stilton truffle. I am having some people in for Sunday, and I wanted to come up with something to serve before the dessert in stead of a normal cheese course.

Heston had mixed stilton and cream cheese. I immediately went to the kitchen and found a slab of stilton and a box of Philadelphia, mixed them at random, rolled spheres and covered them with cocoa powder. I then served one to my wife. That did not go down well. My wife thought she was getting a normal chocolate, and the rather overwhelming taste of ripe stilton cheese hit her like a ton of bricks.

Stilton truffle v 1.0 - failed.

So I needed a less pungent stilton mix. Also, v 1.0 had only a coating of cocoa powder which is rather bitter. A search for stilton and chocolate gave me this video

http://www.lovefood.com/guide/recipes/10663/port-and-stilton-truffles

These truffles are coated with dark chocolate and cocoa powder, but the filling is a ganache with cream, chocolate and stilton.

I wanted that the filling should only be cheese, but it would need to be less strong than the first one. Also, I thought that the whole thing needed a bit of sweetness since the chocolate cover would be 70% dark plus powder. In addition I wanted to add a centre of port. Port and chocolate is great. Port and stilton is great. Port, chocolate and stilton should be divine.

I ended up with a fifty-fifty mix of stilton and mascarpone. I had 100 grams of each. To this I added 6 grams of sugar. I cannot decide wether this was smart or not. During my testing phase, I found the fifty-fifty mix taken with the chocolate to be a bit harsh, but after making the final mix with sugar, I missed some of the tanginess. But now the sugar is there. I placed the mix in the freezer for a few minutes to firm up a bit before forming balls of it.

After making the balls, I placed them back in the freezer. After a few minutes, I took them out again and divided them in two using a sharp knife. And then, back in the freezer.

I could not use port in it natural state. I needed something thicker so that I would have at leased a small chance that the thing would stay in place long enough. On my packet of maltodextrine, there is a recipe for chocolates with a mint filling. The filling is mint liqueur mixed with malto. The recipe called for 30 grams of liqueur and 40 grams of maltodextrine. As you may remember from my post about my modernist caprese salad, I found that the brand of maltodextrine I have is different in strength from the tapioca matodextrine found in some other recipes, so this may be way off if you are trying to make it with tapioca malto. For that revipe I found that I needed around 5 times the amount of my malto compared to the tapioca malto based recipe.

I got out a bottle of port and measured out a bit more than 30 grams. I wanted to take the alcohol out of it so I boiled it for a couple of minutes. I then checked the weight again, and added a bit more to get back up to 30 grams. I then added 40 grams of malto and started mixing. I must say that I maltodextrine and I are not great friends. I had, as you have seen, difficulties with it in the caprese recipe, and it was fighting back here as well. It started clumping quite badly. But after grappling with it, mixing with a fork for some time, I got a fairly smooth, thickish port filling.


The plan was now to carve out small spaces in each half and fill
those with port using a syringe. So I got them out again and with a small knife, made small holes in each. I then sucked the now thickish port into the syringe and carefully administered a drop in each cavity. This actually went quite well. The port stayed more or less where it should. After this, I put the tray back in the freezer again.

Next time I got them out, I just put the two halves of each ball back together again, smearing some cheese around the cracks to try to seal them up. I had anticipated that filling the small rascals would be very difficult and messy, but as it turned out, it had been quite straight forward. I do think that putting them in the freezer for a few minutes between each step helped as it kept them quite firm throughout the process. Anyway, I had now some nice cheese balls with port filling. And now to the chocolate.

From the video about stilton truffles I linked to above, I learned that to melt and temper the chocolate, I should first melt it over a water bath, take it if the heat and then add 1/3rd more and let that melt and cool the molten chocolate. So I did. I then got the cheese balls out.

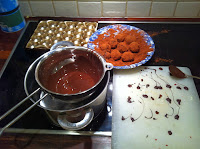
This is where it gets real messy. With my hand, I got one ball, dipped it and rolled it around in the molten chocolate and then put it in a bowl with cocoa powder. With my other hand, I made sure that the ball was nicely covered with the powder all over. This is really about getting your hands dirty. The good thing is that you can lick the dirt off afterwords.

So there they are, my stilton truffles with port fillings. Are they any good? I don't know. I will serve them to my panel of guests tomorrow and let them be the jury. From my small tastings during making them,I think they will work, but the real verdict will come tomorrow. I will keep you posted.

Saturday 9 November 2013

Molecular Caprese Salad - my first sphere


As some of you have noticed, I have started a journey into the wonderful world of modernist cuisine. From my studies so far I have reached a temporary conclusion that Modernist Cuisine is all about

- Using science to optimise food, often getting rid of traditionally well known truths and using new ingredients and techniques, for instance sous vide.

- Finding new and unusual, but magnificent flavour pairings. Like chocolate and caviar.

- Having fun with new textures and serving possibly well known food in new ways. This bullet is closely related to what is known as molecular gastronomy which is perhaps what many people think of when (or if) they think about modernist cuisine. This is much of whaFerran Adrià did in his legendary, but now closed, restaurant elBulli. This is amongst other things about taking familiar tastes and adding elements of fun and surprise. That is what I tried to do for my first molecular project.


One of the truly iconic and most simple dishes from Italy is the tomato and mozzarella or caprese salad. This is a simple salad from Capri consisting of tomatoes, mozzarella cheese, basil leaves and olive oil. So I wanted to do a new version of this, and I wanted it to work as an amuse bouche, a small mouthful before the first course. It had to contain the four ingredients, but I wanted to try out some new techniques I have read about.


Reverse Sphere Mozzarella


The first technique is spherification. This has become almost an icon for molecular gastronomy. The idea is that you take the food you want to serve, liquidize it and make it into a sphere contained in a thin gel membrane while the interior of the sphere is still liquid. The spheres may be small, like caviar, and they are then often called - caviar. For instance cured ham with melon caviar. Or they may be much bigger, perhaps the size of a table tennis ball. 

The technique utilises a reaction between an alginate and calcium. There are different ways of doing it, but basically you either mix the liquid food with sodium alginate and drip this into water containing calcium, or you have liquid food containing calcium that is dropped or otherwise submerged into water containing alginate. This second technique is called reverse spherification. In both cases, gel will form where the two solutions meet, and with a little luck (and skill), this will encapsulate your food.

I have tried this before without really having any luck. The ingredients need to be measured very accurately (you will need a scale that can measure down to 0.01 grams). In my previous attempts, I mainly ended up with goo floating in water. This time I decided to try out a recipe I found in my newest favourite website, http://www.molecularrecipes.com/. This fabulous site holds a wealth of information, tips and recipes for molecular gastronomy. So in there I found a recipe for reverse spherical mozzarella. 

http://www.molecularrecipes.com/spherification/reverse-spherical-mozzarellas/


This recipe uses the fact that mozzarella already contains calcium, so you do not need to add that. I bought a number of molecular ingredients a few years ago, but did not have much luck in using them then, but I still have them, so I went down to the basement and got out my box of alginate.

http://www.albertyferranadria.com/eng/texturas-spherification-algin.html

For those of you living in Norway, and especially in the Oslo area like me, ingredients like this (but not the same brand) can be bought at

http://sousvidenorge.no/

The shop is situated at Mathallen in Oslo, but they also ship to other parts of the country. They are my main supplier of stuff for this kind of cooking and also have sous vide equipment, knives and other kitchen utensils.


I got two packets of mozzarella, kept the water they were packaged in, shredded the cheese and put it in my blender with the water and cream. This was blended into something resembling very heavy cream. I added salt and put it in the fridge.

Now for the alginate bath. I weighted up 7.5 grams of Algin and dissolved into to 1.5 litres of water using my immersion blender. This is when I read that the solution should be left in the fridge for 24 hours before use for best results. Oh, well. I let it have about two hours and hoped it worked. 


Using a round measuring spoon, I carefully filled it with mozzarella cream and even more carefully released into the alginate solution while holding my breath. It kept its shape beautifully, and soon I had a number of spheres floating around in there. It is important that the entire sphere is covered with the alginate solution, so I carefully waved some on top of the ones that were not quite submerged. After 12 minutes I carefully took them out using a draining spoon and placed them in plain water to rinse. These babies are very delicate and fragile, so they need to be handled with the outmost care.

Spheres: DONE. Easy.


Powdered tomato


Tomato is an important taste in the caprese salad. My plan is to add tomatoes as a powder sprinkled on the mozzarella sphere. To powder tomatoes you have to dry them and then crush them. Turning to page 312 in volume three of Modernist Cuisine, I see that the drying stage may be accomplished in the microwave oven. According to the book, low power for 30-40 minutes should do the trick. The lowest power on my micro wave is 90 Watts. 


I washed, halfed, de-seeded and finely choped three tomatoes. As described in the book I also tried to squeeze out some moisture from the pulp before spreading it out thinly on a plate covered with parchment paper and placing it in the microwave oven.

After 35 minutes I checked in on it, but the tomatoes werre still quite moist, so I set the power up to 350 Watts and left them for another 20 minutes. Still much of it was a bit moist, but now some of the thinner bits were getting very dark.
I don't know why this did not seem to work properly, but I ended up setting my ordinary oven to 80 degrees with the fan on and placing the tomatoes in there for another 20 minutes. After this they were completely dry and I could crush them in my mortar. 

My main wish for Christmas this year is a dehydrator. I would really like to start experimenting more with different textures, and having a crunchy texture together with soft textures have a great effect. I have been looking at the Excalibur dehydrator (http://sousvidenorge.no/butikk/maskiner/torkeskap) and I think I just need one. So, anyone near me, take a note of that. :-)

Anyway, at last I have my tomato powder ready. The taste is really nice and condensed. I have not crushed all of it to a fine powder as I also like the slightly larger, crunchy bits.

Tomato powder: DONE


Crisp basil leaves

Basil is the third of the main ingredients in the salad. I want my basil to be crisp. Also on page 312 in volume three of Modernist Cuisine is a way to dry or fry herbs in the micro wave. You just oil a plate (according to the book you should use plastic wrap on top of the plate, probably to be able to take the leaves off easier afterwards, but I did not do that), place the leaves on top and brush the leaves with oil as well. Microvave at 600W (Mine was set to 650) for 4 minutes or until crisp, checking every 1,5 minutes to prevent burning. After a little more than three minutes the leaves were nice and crisp and I placeed them on paper towel to dry off excess oil.

Crisp basil leaves: DONE

Crunchy olive oil


As an added element I wanted to try out this recipe I found on molecularrecepies.com:


Maltodextrin is a starch that is slightly sweet. See


It turns out that when you mix maltodextrin with fat, you can "dehydrate" the fat or oil and make it into a dry substance. This youtube video shows this in action:


Now, both the recipe and the youtube video calls for tapioca maltodextrin, but according to the wikipedia entry above, it is most often made from corn or wheat. I got my malto from my local retailer (http://sousvidenorge.no/), and it does not say anywhere what it is made from. What I do know is that it behaved differently than in the recipe and video, so it is probably a different type. The recipe calls for 80 grams of oil and 25 grams of maltodextrin. After whipping this for a couple of minutes, it should turn crumbly.
Mine was a wet goo. I actually had to add 125 grams of the stuff, and even then it was like slightly dry tooth paste. But I found that if I had that in a skillet and fried it while chopping it up, it would dry into something resembling what was in the picture. I see in the comments to the recipe that Chef Ivar has found the same to be true. He used 125 grams. And Ivar is a Norwegian name, so he is probably using the same supplier as I am. I have, however, found a source for tapioca malto here:

and they can ship world wide, so I will be ordering some (and I see they other cool stuff as well...). I also see from the video that he starts with the malto in a food processor and adds oil gradually. I chucked all of the malto into the oil and whisked by hand. That may make a difference. 

Also, according to both recipe and video, the crumbles (or powder if you make it into that) should melt back to oil once you have it in your mouth. Mine turns to a fudge like consistency with the properties of glue. Not quite successful. I need to research this a bit more.

Crunchy olive oil: DONEish. Almost. 


Reverse sphere mozzarella with tomato powder, crispy basil leaf and crunchy olive oil


So now all my elements are done. I got a set of those nice spoons that you can use to serve up amuse bouches just like in the restaurants and put one mozzarella sphere in a spoon. I sprinkled tomato powder on it using a small sieve, added one basil leaf and spread some crunchy (or actually chewy) lumps of oil around it all. Looked good and also tasted quite well. First you get an explosion of mozzarella, then you get some nice tomato flavours and basil. Nice.


Saturday 2 November 2013

Strawberries with ginger and pepper tuile and balsamico pearls


I noticed that I have been mentioning the restaurant The Fat Duck frequently lately. I must admit that I am slightly hooked on that place for the time being. Now I just watched a television program from their kitchen, and there I saw something that intrigued me. They used vacuum to compress strawberries and to quickly infuse them with flavor. Since I have a vacuum machine with my sous vide kit, I thought I should try this out. So I set out to make a dessert based on that and a couple of other elements I found on the internet.

The strawberries

This being October in Norway,
good, tasty strawberries are not found in the shops, so I had to buy some that looked nice, but that really did not taste much and also felt a bit dry. After rinsing them, I dusted them with icing sugar and placed them in a vacuum bag. I then sucked the air out. This I could not really do this at full pressure since that would make juice flow into the vacuum machine, so I stopped it once I saw that some amount of juice reached the edge. This is not optimal since we want some of the cell walls to break and air to be crushed out of the berries. Restaurants will have a more powerful and machine that works differently so that they can use a larger pressure. Anyway, I repeated this two more times.

So what did all this hocus pocus do? Well, since strawberries are quite delicate, the pressure from the vacuum will start breaking down cell walls and perhaps also suck any air out of the berries. In this way the berries are compressed and concentrated. The original recipe uses a chamber vacuum sealer where the berries are placed inside a chamber where all the air is pumped out. This may create a lower vacuum pressure, and at very low pressure, liquids like water boils at very low temperatures. In this way, the berries are actually subject to some form of heat treatment.

Anyway, when tasting the processed berries together with the un-processed ones, there was a clear difference. The un-processed berries were quite dry, a bit tough and tasteless. The processed berries on the other hand were moist (since juice had been leaking from them), but also softer and had a deeper and more condensed taste. They had taken on some of the characteristics of strawberry jam, but they were still strawberries.

The ginger and black pepper tuile

 Pepper goes well with strawberries. Perhaps not the most widely used combination, but it adds depth. I found this recipe on the web:

http://realfood.tesco.com/recipes/ginger-and-black-pepper-tuiles-with-ice-cream.html

I mixed the batter and spread it out. In hindsight I should probably have spread it thinner and/or done them at a lower temperature for longer because they did retain a slightly moist kernel in stead of being crunchy.

The balsamic vinegar pearls

Spheres in different sizes have become one of the icons of what is known as molecular cooking. Ferran Adrià perfected this in his legendary former restaurant el Bulli. These are often done using some form of alginate solution that dripped into some form of calcium solution. I have tried this, but have not really had much luck. I will experiment further and document my efforts in these pages.

Recently I came across this recipe:

http://www.modernistcookingmadeeasy.com/info/modernist-recipes/more/balsamic-vinegar-pearls-recipe

This uses agar agar as a gelling agent and exploiting the fact that agar agar when cooled from boiling temperature sets at around 35 degrees. So dripping a solution of agar agar in balsamic vinegar into cold oil that has been in the freezer for 30 minutes, the droplets will cool and set before they reach the bottom of the oil. This proved to be an easier way of making spheres.


To plate, I cut the berries into slices and arranged on a plate, placed the black pearls on top, added to small basil leaves and a piece of tuile before sprinkling icing sugar over the whole thing. All in all a good desert with lots of taste. Just make sure there is not too much ginger in the tuile as that will easily overpower the rest.