Pages

Friday, 3 October 2014

Sous vide eggs - Devilled eggs, modernist style

Many people buy sous vide set-ups thinking they will mainly use it for meat. The truth is that sous vide is not just a way of cooking meat.  Yes, it is great for slow cooking tough cuts, but I have actually heard a professional chef state that finer cuts like a fillet should never be done sous vide. While that may be discussed, it is a fact that it may be better for a lot of other ingredients such as fish and vegetables because of the total control and low temperature.

Eggs are highly temperature dependent and as such are great for cooking sous vide.  Being able to control the temperature exactly gives you the opportunity to produce a wide variety of textures. The proteins in the yolk start thickening (or gelling) at 65 degrees Celsius and set at 70. Higher temperatures will produce even harder yolk until it gets quite crumbly.

Meanwhile, the egg white consists of several proteins that sets at temperatures ranging from 61 to 84 degrees. The proteins setting at the lowest temperatures comprises only a small portion of the egg white. The main bulk (54%) of it is a protein called ovalbumin which set at 80 degrees. So cooking the egg to specific temperatures will produce different textures and hardness especially in the egg whites. Chef Thomas Keller, for instance, cooks his eggs sous vide at 62.5 degrees for one hour producing an egg with a slightly set white and a yolk that stays within its "skin" when the shell is opened, but is like a poached yolk when cut.

As some of you may know, I am currently reading through the five volume "Modernist Cuisine".  I have reached volume four and all this is explained in detail in the chapter on gelling.  In that chapter there is a rather interesting recipe for a modernist take on devilled eggs.

I cooked whole eggs in the shell sous vide at 72 degrees for 35 minutes. As we now know, this would give me a yolk that has set, but that is not very hard and a white that has started to set, but is still quite loose.  As I peeled the eggs, the white actually held the shape, but it did feel rather delicate as if it would disintegrate at any moment.


And as I separated the yolks and the white, they did disintegrate
leaving me with two perfect yellow spheres and a half runny mess of white. I mixed the two whites with 12 grams of white wine vinegar and 5 grams of Dijon mustard. As I started whisking the whites, they became quite liquid, or rather a mix between liquid and a gel.  So before I separated the whites from the yolks they were a weak gel, and after handling them and beating them they became a thick liquid, thus proving that eggs that have not set fully are indeed fluid gels!

To the egg/vinegar/mustard mixture I slowly whisked in 60 grams of oil. The recipe says 50 grams of olive oil and 10 grams of walnut oil. I did not have the latter, so I substituted with sesame seed oil. This has a rather strong taste. The result was ok, but I should probably have substituted some or all of it with more olive oil. Anyway, this gave med a nice white mayonnaise which I seasoned with salt, pepper and some cayenne pepper.  I also mixed in some chives for added taste and colour.

Plating up, I smeared some of the mayonnaise on a plate, placed one yolk on top and sprinkled some cayenne pepper and sage over it.  The result was quite good. The yolk was moist, but a bit firm. The mayo had a bit of a sting to it. I will definitely experiment more with sous vide eggs!


Monday, 15 September 2014

Food from Historic Heston - Cucumber Ketchup

In my previous post I wrote about my new favourite cookbook, "Historic Heston Blumenthal" where Heston gives us recipes based on his research into old English dishes. The contents of this book is just as intimidating as that of his previous huge book "the Big Fat Duck Cookbook". Recipes are huge and make use of modernist ingredients and techniques that many home cooks have never heard of. Is it possible to cook any of them? I have managed to cook some dishes from the Big Fat Duck, and I want to try my hand at something from Historic as well.


Before you try these recipes it may be useful to know a bit about modernist techniques and ingredients. I have written several posts about that in this blog, but more comprehensive resources can be found at


Also it may be wise to try to find some of the smaller recipes in the book. An easy way of doing that may be simply to count the pages used for the actual recipe. Many of them spread out over three large pages, but some is only one. One of these is the Cucumber Ketchup recipe. Another reason to choose this recipe is that there is a video on youtube showing the head chef at Dinner by Heston Blumenthal making it:


The name of the entire dish is

Roast Scallops with cucumber ketchup, roasted cucumber, butter emulsion, broad beans, bergamot and borage


Cucumber is of course a central part of this dish. I made half a recipe, but still used two and a half cucumbers. These are used in three ways:

- As roasted blocks
- As compressed small cubes
- As juice for the ketchup base


The cucumber blocks were cut from the cucumber and just fried in oil until they got a brown, caramelised exterior. After that I had them in a medium hot oven for some minutes.

The slices of cucumber that you can see in the picture above to the right will become small cubes in the ketchup. These will provide crispiness to it. In the recipe, these slices are compressed using a chamber style vacuum machine. What this does is that is compresses the meat of the cucumber so that it takes on a more dense, semi transparent and rather wonderful texture.

Vacuum machines are used to place food in plastic bags without air when you want to cook the food sous vide, meaning cooking the bag in temperature controlled water bath. There are two main types of these machines. There is the edge style, which I have, that just sucks the air out of the opening of the bag, and then there is the chamber style that actually places the food in actual vacuum. This latter type is what you need here, and they are terribly expensive, so that is basically out of reach for most people. So compressing in a vacuum machine is out of the question.

I am quite sure, however, that I have read somewhere that you can do something like that using a spuma bottle or whipping siphon, and I have one of those. So I put my slices of cucumber into the bottle, charged with two N2cartridges and waited a bit. I discharged the gas, opened the bottle and ... nothing, really. Did not work. I could see no difference from when I put them in. A bit of a disappointment. I have to research that properly. The cucumber cubes needed to go into he ketchup in their natural state. So I just cubed them up and put them aside.


Another element that is added to the ketchup is pickled shallots. This element is very easy to make. I just heated vinegar with sugar and salt to dissolve them, let it cool and added finely diced shallots. The recipe calls for Chardonnay vinegar. I could not get hold of that, so I used a good white wine vinegar in stead. I do not really know, of course, if the strength of my vinegar matches the one in the recipe. This is a typical trade-off I think I will have to make every now and then in order to be able to make these dishes.


Now for the actual cucumber ketchup. The basis for this is cucumber juice. I juiced the rest of the cucumbers using my Phillips juicer. When my wife bought this rather clumsy looking machine I felt that we really did not need it, but now I am growing rather fond of it. It makes a beautiful job of juicing just about any vegetable. Anyway, it had no difficulty whatsoever of turning the cucumbers into juice. 


The ketchup is actually a fluid gel. Fluid gels have become something of an icon for modernist cuisine. I wrote about fluid gels in this post. Basically it is about taking a liquid, making it into a gel using one of several gelling agents and then crushing that gel into a puree. This gives you a puree (or sauce) that has a very smooth texture and that may give you more flavour that purees and sauces thickened with "old fashion" starches.

The gelling agent we will be using is Gellan F. I combined vinegar (again substituting with the brand I had) and sugar and heated that to dissolve the sugar. I then combined the cucumber juice, salt and Gellan. The recipe calls for a specific type of food processor called a Thermomix. This is a machine that can mix and heat at the same time. I do want one, but it is not cheap. In stead I combined the juice, Gellan and salt cold in a pan and mixed thoroughly using an immersion blender. It is important that the Gellan is mixed completely with the liquid, and that is easiest done while the liquid is cold. I then brought the mix to a boil. Gellan needs to be heated to about 90 degrees Celsius before gelling. After that I placed the mixture over ice, and as it cooled down it formed a quite strong but brittle gel.

To crush this gel to get the fluid gel you may used an immersion blender, but the blender will often mix in quite a lot of air into the gel resulting in a very cloudy result. I have learned that using a normal blender results in less air being mixed in, resulting in a clearer fluid gel. So I put the gel and the vinegar and sugar solution into my blender and started it up. It needs to work for a bit of time in order to produce a really smooth gel.


Adding the cubed cucumber and the pickled shallots with some dill finished of the cucumber ketchup.


This dish also has a butter emulsion. This is just cubed, tempered butter that is whisked into a small amount of water to form an emulsion. To this, the recipe adds bergamot juice. Bergamot is a citrus fruit the size of an orange with a yellow colour similar to a lemon. I have never seen bergamot juice in any shops, so adding that was a bit of a problem. What I do know is that bergamot is what gives the characteristic taste of Earl Grey tea. 
I opened am Earl Grey teabag hoping to find a component there that would be bergamot, but the flavour is probably added to the tea leaves as an oil or something. I found nothing. I then opted to actually infusing the butter emulsion with some Earl Grey tea for a short time. I was a bit anxious of leaving it too long as I really did not want to make tea. I probably left it in for 60-90 seconds, and I do believe that it made a difference. Whether it made the right difference I do not know.


Now to the scallops. These were just lightly fried on one side to get them caramelised there and just warmed a bit on the other side. A bit of salt and pepper finished them off.

I heated broad beans in the butter emulsion and plated up with a layer of cucumber ketchup on the plate, a fried cucumber block cut in two pieces on the ketchup, the scallops placed on and around the cucumbers, beans spread around and the emulsion over as a sauce. The recipe calls for borage leaves, but I did not have that either, so I put some dill on top.

I served this up for my daughter and me, and we both gave it a good verdict. 

Making food from the Historic Heston book IS possible if you have a bit of basic knowledge about modernist techniques and ingredients and if you are willing to compromise a bit on some of the ingredients. I will absolutely be trying out more dishes soon!


Sunday, 14 September 2014

Historic Heston - a fantastic book

I love books, and especially books that are well made. And interesting. And good looking. I have mentioned Heston Blumenthal's book The Big Fat Duck Cookbook (in this post). That is a gorgeous book, full of interesting information, art, recipes and stunning food images. When we had lunch at The Fat Duck (see this post) I bought another book of his: Historic Heston Blumenthal. And it is actually signed by the man himself as well!

Heston has for a number of years been interested in old recipes from England. We are talking about recipes dating back from the 14th century and up until the 19th. He has collected and studied these, but it would not be Heston if he didn't also interpret them in his own way. All this ended up with his restaurant in London called Dinner by Heston Blumenthal. I have a table reservation there in a couple of weeks, so there will be a blog posts coming your way after that. But in addition to the restaurant he has also made a new book, and it is absolutely stunning.

First of all it is huge, the same size as the Fat Duck one, and they do make a bit of the same impression, but I think Historic is even more visually stunning than the Duck. There seems to be more artwork, both new and old, and the food images are just as great as in the previous book.

The volume starts out with a chapter entitled "To the Reader" where Heston outlines his quest for old recipes.

Then there are the recipes them selves. Each chapter is one recipe,
and each recipe starts out with some old artwork to put you in the mood and by quoting the original as found in some old book or other source.


Following that there are anything from 4 to 8 pages of rather interesting text describing Heston's work with this dish and how it transformed into the modern version.


And then there is the recipe itself as Heston cooks it, and more or less how it is served in the restaurant in London. If you have read the Fat Duck book, you know a bit about what to expect. If not, you may be quite overwhelmed. Heston's full recipes always contain many components, each component being a sub-recipe in itself, and each of these components will either be used in another component or while plating the dish.

For instance the innocent sounding Nettle Porridge has the following sub-recipes:

  • Parsley and Nettle Puree
  • Garlic Puree
  • Shallots
  • Mushrooms
  • Parsley and Nettle Butter (using all of the above)
  • Garlic Butter
  • Walnut Vinaigrette Base
  • Garlic-Walnut Vinaigrette (using the Garlic Butter and the Vinaigrette Base)
  • Smoked Olive Oil
  • Pickled Smoked Golden Beetroot (using Smoked Olive Oil)
  • Pickled Ruby Beetroot
  • Finished Pickled Golden and Ruby Beetroot (using the two above plus Vegetable Braising Liquid from another recipe)
  • 5% Garlic Herb Brine
  • Brined Frogs Legs (using the brine)
  • Cooked Frogs Legs (using the above)
  • Cooked Cods Palate (using Garlic Butter from above)
And finally
  • To serve (Using all of the above plus 4-5 other ingredients).
All this is spread out over three pages. And following that is a piece of food porn showing the finished dish.


As in most recipes of this caliber, measures are in grams. You do not use 2 dl of water, but rather 200 grams. or 210 grams. This is because measuring devices for liquids often are less than accurate, and these recipes are all about accuracy. You do not use one egg, but 47 grams of egg. And you will also need scales capable of measuring at least 0.1 grams accurately. This is because some of the modernist ingredients such as Gellan or Xanthan is used in very small quantities and a difference of a few tenths of a gram makes all the difference.

So, is it possible to cook anything from the book? Well, yes, I believe so, even though if you are a food nerd, just reading the book is an experience in itself. It may help to have done a few modernist dishes before and to know a little bit about the techniques involved. For some great sources for that, see for instance
One major hurdle may be getting the ingredients. These difficult ingredients fall into two categories. Recipes often refers to for instance specific types of vinegars or oils that may be easy to get in for instance England, but not in your little, obscure country, for instance Norway (in my case). In addition to that, there are specific modernist ingredients (or at least they are considered modernist now, but they may become mainstream soon) like Gellan and Xanthan. I have found that this latter group is becoming more and more easy to find in speciality shops (in Norway, try http://sousvidenorge.no/) or you can order them on-line at for instance
These ship world wide.

In the coming months I will be trying to cook some of the recipes in the book. Some of the recipes are smaller and easier than others, so I will be starting with some of them. Hopefully I will be able to make at least a small number of them. And I will also report on my visit to the Dinner restaurant. Keep an eye out for the blogposts!


Monday, 1 September 2014

My take on Salmon 40 C from Chefsteps

I have repeatedly hoorayed the online cooking community Chefsteps (https://www.chefsteps.com/) on this blog, and this is a new episode of festive outcries on their behalf. "Why", you may ask yourself clicking the tongue and raising a scorning eyebrow, "why this ever on-going lyrical outbursts about a website?" Well, it is because they are fun, easy to follow and are all about finding new and exciting ways of cooking.

This time I have tried out their Salmon 104 F, or 40 C for us in the Celsius world. This project is described in detail on http://www.chefsteps.com/projects/salmon-104-f#/salmon-104-f and I encourage you to try it out.

At the core of the dish is a piece of salmon that has been cured and cooked sous vide at 40 degrees Celsius, which is a very low temperature, indeed.

As you may know, food may be prepared using either salt (as in curing) or heat (as in cooking). Both adding enough salt to cure meat or fish or enough heat to cook it will start to unravel and entangle causing gelling. It turns out that adding both salt AND heat may produce the same result with less salt and less heat producing a spectacular texture. This is what this dish is all about.

After brining the salmon for the required 45 minutes I used a ziplock bag for the sous vide step. Since I wanted to add oil to the fish in the bag, pulling a vacuum on it using my edge style vacuum machine was not an option. For that you need a chamber machine, and currently they are way too expensive for us amateurs. Someone need to come up with an inexpensive one!

To get the air out, I just lowered the bag into the water bath until the ziplock was just above the water surface. This will press the air out so that you can lock the bag and have very little air in it. Depending on the stiffness of the bag, some air may still be left in it, though.

The horseradish cream was easy. I grated fresh horseradish using a microplane and popped it into the cream and left it in the fridge for about 7 hours. According to the recipe you can have it in for up to 24 hours. After 7 hours, mine had a nice but not overpowering taste of the horseradish. After straining I added the salt and the Xanthan and whipped it into a soft cream. The small amount of Xanthan will make the cream velvety. I must say that I did find the end product a slight bit on the salty side, so I may take down the salt a bit next time.

I could not get hold of watercress. What I ended up with was spinach for the pure. This actually worked quite well. And I did love the way the pure is made. After blanching and chilling it, just give it a swirl in the blender together with whatever amount of water that naturally clings to it from the ice bath. Then add 0.1% Xanthan in relation to the contents of the blender. The Xanthan will thicken it a bit and also make sure the tiny spinach particles are suspended in the liquid so that the pure does not start to separate. Salt is added just before serving so that the salt does not have time to start discolouring the nice green pure. I will be trying this with other ingredients as well now.

For the pickled onions I used red onions (could not get baby ones) and spring onions. One has go go with what one can get hold off. This is really easy to make except for one little sentence in the recipe. After splitting the red onion into separate petals, you should

"Finally, peel and discard the membrane from the petals."

Now, there's a time consuming task for you! And afterwords, when reading about the plating of the dish, there is

"You can peel the membrane from each layer before of after the pickling, or not at all."

Hm. Next time it may be not at all.

So, with all the elements done, I was ready for plating. This project on ChefSteps also talks extensively about the plating of the dish. All the ChefSteps recipes are always plated beautifully. I always try to mimic them, but mine mostly turn out looking like a 5-year old had a go at it. I really need to practice this. On this dish I did not do too badly, though. Just need to keep the amounts and sizes down a bit. And the olive oil did not add much, just made a bit of a mess.

All in all a fun project. If you are into a bit of modern cooking and fancy something light, give it a go!


Tuesday, 29 July 2014

Fluid Gels on Chefsteps!

I have mentioned fluid gels before. This is one of the iconic parts of modernist cuisine and is a great new way of doing sauces and purees. Now there is a great opportunity to learn about this new thing on chefsteps.com. This is one of my favourite web sites and a great resource for anyone who wants to learn about new ways of cooking and how to optimise food. Just go to https://www.chefsteps.com/classes/fluid-gels/landing#/.

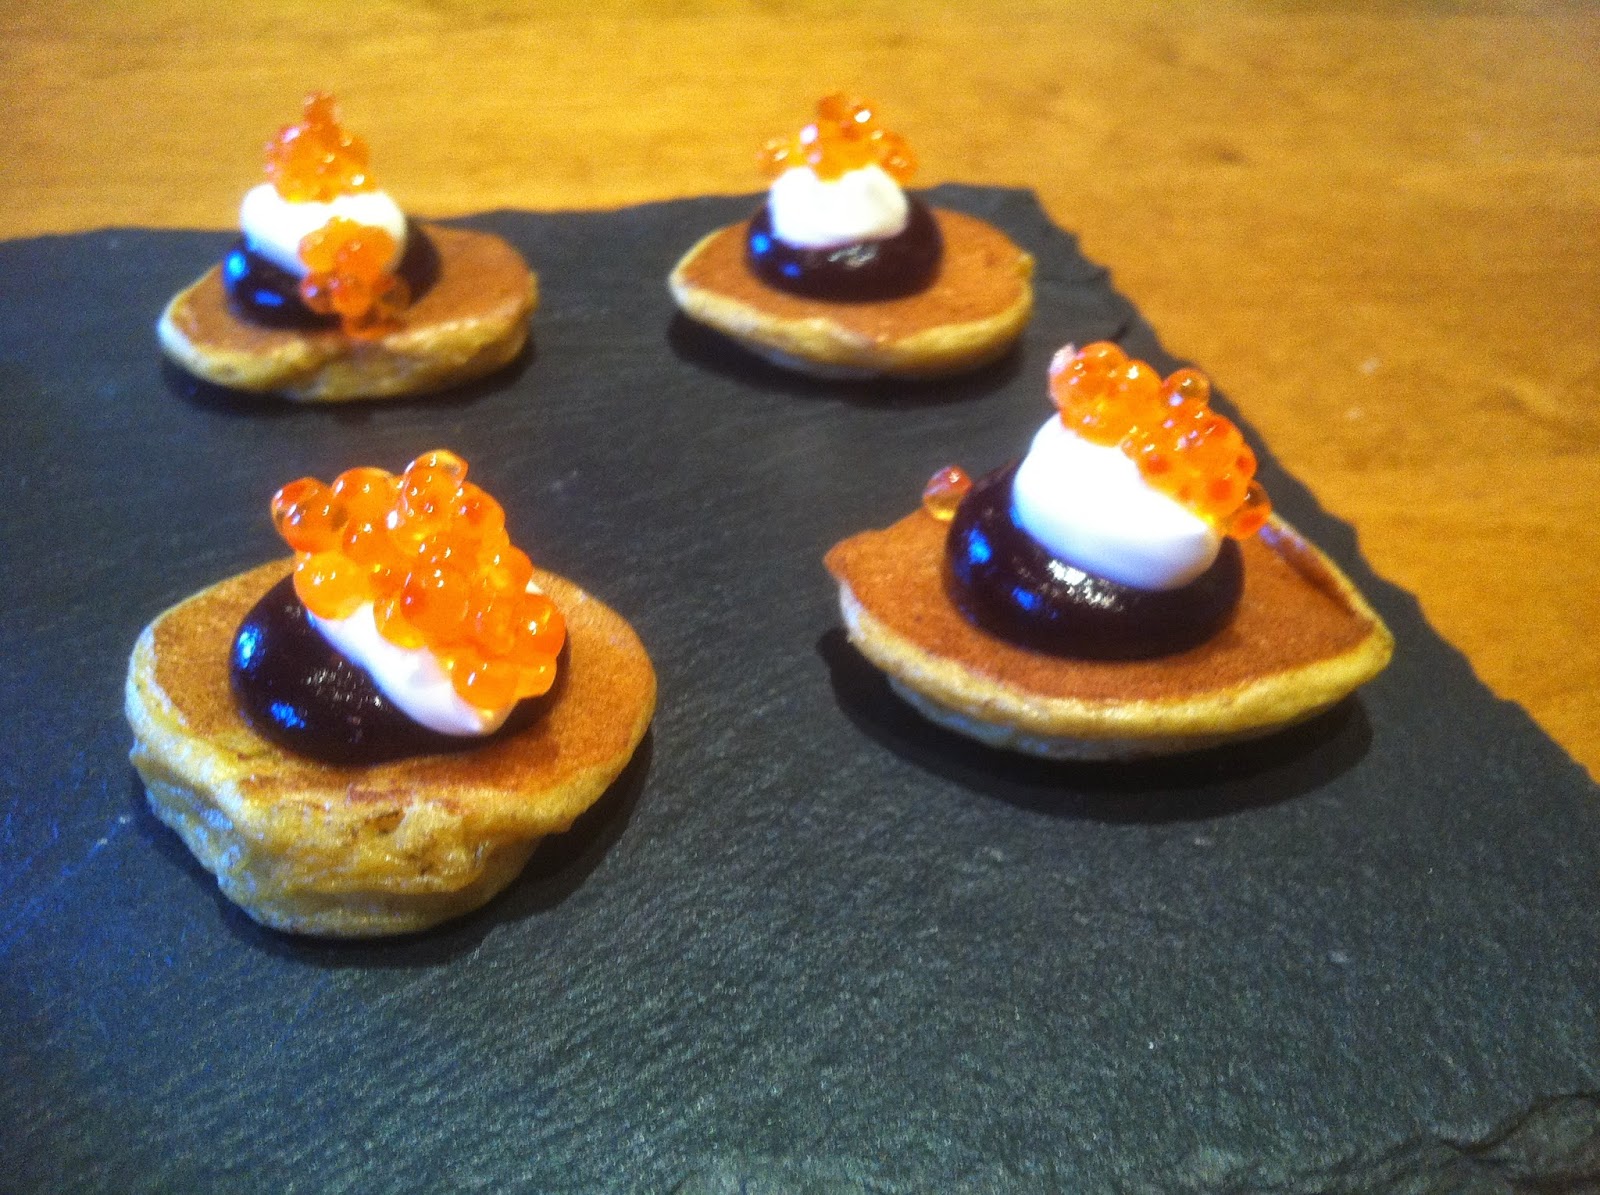
I tried out the beet fluid gel and used it in their blini recipe. Worked out perfectly. I started with 9 beets which I peeled and diced and juiced in my Phillips juicer.
This piece of machinery does a fantastic job at turning vegetables into juice. After adding the balsamic vinegar and the mix of salt, gellan and xantana, I brought it to a boil and chilled it over an ice bath.

This resulted in a nice gel that I then churned in a blender. The resulting fluid gel turned out perfectly.

The blinis did not visually turn out as well as they could because I portioned them in the pan using a spoon in stead of a bottle. I topped them with the beet fluid gel, creme fraiche and trout roe. Quit yummy!

By the way, I had quite a lot of fluid gel left. When we had lunch at the Fat Duck, we had a very nice beet meringue thingy. I put my fluid gel in my spuma bottle, added two cream chargers and made some tops on a sheet of baking paper. These I put in my dehydrator to see if i could make something resembling those. I could not. The nice tops of beet fluid gel had complete flattened by the time they dried, so I ended up with flat turds on paper.

Monday, 14 July 2014

A Tuscany adventure - #8, More pizza!

More Pizza!

Just a follow-up on yesterday's pizza post. I just wanted to share some more pictures from SiToscana's first pizza evening, this time from their own blog.

Go to http://blog.sitoscana.com/2014/07/3036.html and enjoy!